Coding and debugging 16-bit x86 Assembler with DOSBox
When I started with reversing Dune I felt that I needed to code my own Assembler programs and run them DOSBox. Simply to make sure that I understood the code and logic I was studying. I had some issues finding good information on how to get started with it though. It was easy to find complete information on writing and build assembler code for Linux, but less so for good old MS DOS.
So for anyone else that wants to do the same journey, I have compiled some links and made a short Hello World example for an easier start.
If you are completely new to Assembler, I suggest going through this guide for Linux Assembler. It is not the same as Assembler for DOS, but it will teach you the basic concepts.
Tools
Beside debug version of DOSBox, I use the assembly compiler Flat Assembler. Both Windows and DOS versions of Flat Assembler exists. To begin with I’ll show you how to make an DOS executable with the Windows version and at the end, I’ll show how to use the DOS version.
(Please note that Debug version of DOSBox requires that regular version is install.)
Information
A few useful links. It is far from complete coverage of everything worth knowing, but still helpful I hope. For anything they don’t cover, I’ll have to refer you to Google.
- Intel Pentium Instruction Set Reference All the instructions that can be used.
- Interrupt Services DOS/BIOS/EMS/Mouse For talking with DOS and the hardware
- DOS INT 21h - DOS Function Codes More about talking to DOS
- DOS related FAQ on the Flat Assembler forum Various bits of information
- OSDev.org - Contains information about the x86 architecture and more.
- FreeVGA - Graphics hardware information. (Contains references, but not a good place to start learning VGA programming I’m afraid.)
Also a good read about Assembly programming is “Zen of Assembly Language: Volume I, Knowledge” by Michael Abrash (Note: A volumn 2 was never published). It gave a lot of insights into why Dune was programmed the way it was.
A Hello World Example
Once you have downloaded and installed the tools, start the Windows version of Flat Assembler and copy paste the code below in to the window.
; Hello World example

format MZ

; Set data segment to same as code segment
        push cs
        pop ds

; Print text
        mov ah, 9       ; Print String code
        mov dx, hello_world_string
        int 0x21

; exit
        mov ax,4C00h ; Exit code
        int 21h

hello_world_string:
        db 'Hello World$' ; $ = end of string marker
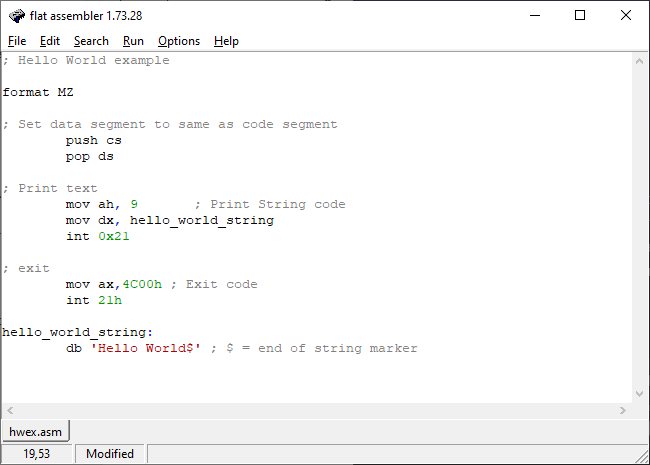
In the menu, select “Run” and then “Compile”. Select where to save the file and name it “hwex.exe”.
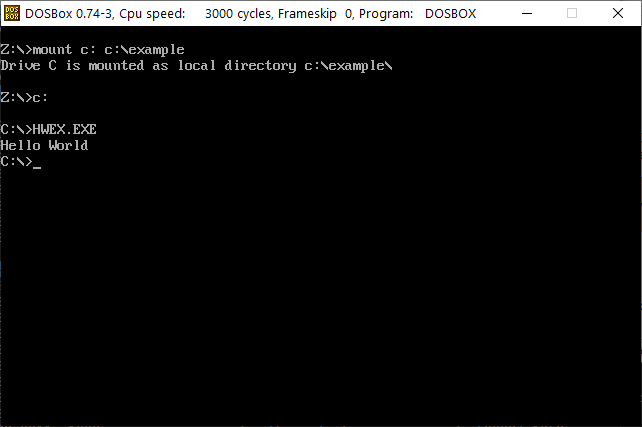
Now you have an executable that can be run and debugged in DOSBox. But to access it in DOSBox, you’ll need to mount the folder where you saved it first. It can be done by calling the Mount command in the DOSBox prompt. It will create a new drive that will allow you to access the folders content. Type “mount”, followed by a letter and a colon and lastly the path to the folder you want to mount. Like this:
mount f: C:\example
And when that is done, navigate to the new drive and run the executable.
If you want to debug it and step through the instructions one by one, type “debug hwex.exe”.
Breakdown of the code
format MZ
This line tells Flat Assembler that we want a DOS-executable as output. It will make sure we have a MZ header at the start of the file.
; Set data segment to same as code segment
	push cs
	pop ds

; Print text
	mov ah, 9	; Print String code
	mov dx, hello_world_string
	int 0x21
This part is where the instructions for printing “Hello World” are. In this example we are using a DOS function to print the code.
We’re using the label “hello_world_string” (defined later) to refer to an offset in the code segment. Because the offset is in the code segment, the data segment register needs to be set to the same value.
Then the function is called by setting AH to 9, DS:DX to the memory location where the bytes to print are and calling Interrupt Procedure 0x21.
; exit
	mov ax,4C00h ; Exit code
	int 21h
This tells DOS to step executing the code and return to the prompt. If not called, the bytes that follow will be executed as code. Leading to all kinds of weird random stuff.
hello_world_string:
	db 'Hello World$' ; $ = end of string marker
This is the data part of the code. In this case it is a string och bytes that ends with a $ symbol. The $ symbol is important and used by the printing function to know where the end of the string is.
If you looked into Linux assembler (or any other) you might notice that the data segment is not marked out in code. DOS does not require that code and data are separate. They can be mixed and data can be treated as code and vice versa. The means that code can be rewritten in memory by the code it self.
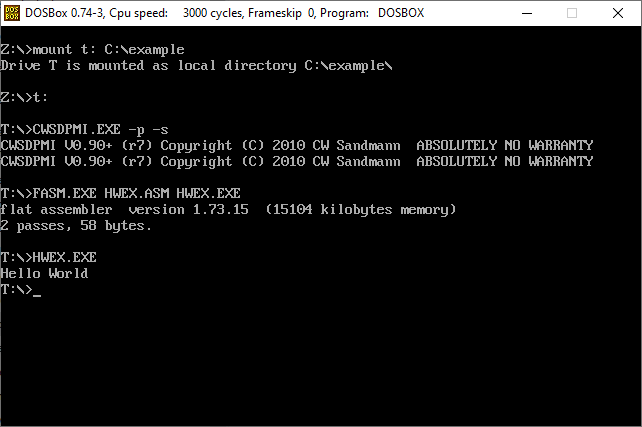
Using DOS version of Flat Assembler
To use the DOS version of Flat Assembler, you’ll need an utility like CWSDPMI. It is a DPMI host that is needed to execute the Flat Assembler. As far as I understand it, it allows Flat Assembler to run in Unreal memory mode.
Both programs needs to be accessible on DOSBox
Mount all the folders needed to access our code, Flat Assembler and CWSDPMI in them. (For demonstration purpose I placed everything in the same folder.)
So to get started, in DOSBox, navigate to the location where CWSDPMI is and type:
CWSDPMI.EXE -p - s
The -p will keep the application in memory and remove the need to restart CWSDPMI everytime before running Flat Assembler. Just omit it If you want CWSDPMI to unload after running Flat Assembler. The -s will turn off usage of virtual memory (removing the need to have and define a location for a swap file).
Lastly, run the Flat Assembly executable with path to code file and path to wanted output as parameters.
fasm.exe hwex.asm hwex.exe
Now you should have a hwex.exe file that you can execute.
I hope this post have been enough to get you started. If you want to know more about debugging in DOSBox, check out my earlier blog post Understanding the DOSBox debug screen.
/Henrik