Exploring the Dune files - Portrait Animations
Finally, we have reached the last part of the image files, the animation instructions. This post assumes you have read the earlier ones, and if you haven’t, links to them can be found on this page.
This part (of the file) contains instructions on how to animate the faces of the character that the file has images for.
It can be found as the last part of an image file and always starts with 0x0000 word and ends with a 0xFF byte.
The subparts
The part can broadly be divided into three subparts.
- A “header”
- List of “Image groups” and which images are used in each group. These are used to create the frame for the animations. The instructions for constructing an animation frame will reference these groups instead of each image individually.
- List of animations and which “Image groups” are used for each frame.
Header
The header consists of seven words
- Starts with a 0x0000 word. Basically, it tells us that this part is not an image as the first word would be used for width and compression values for an image part.
- Second word that tells the length of what remains of the current part.
- The next four words define the position of the animation and its width and height.
- X position on screen, column offset.
- Y position on screen, row offset.
- Width of animation
- Height of animation
- Lastly, the seventh word is the relative offset to the third subpart, the list of offsets to animation definitions.

Image groups
The second subpart starts with a list of words that define offsets to the various image groups. The offset is relative to the start of the list. Meaning the offset value should be added to the position of the first word. The first offset also tells the length of the list in bytes.
After that we have all the Image group definitions. First byte is a number that tells which image in the file to use, second byte is the column position and third is the row position. The position values should be added to the ones defined in the header to get the correct position on the screen. These three types of bytes will repeat until a byte with value 0x00 is met. Which marks the end of the image group.

A smaller image group can be nested inside a bigger one. Meaning that you need to parse the list in the beginning of the subpart to get all image groups. Simply relying on the 0x00 byte to know where one image group starts and ends is not enough.
Animation and frame definitions
The third subpart also starts off with a list of offsets. These are pointing to groups of animations, each containing a series of frames. In these animation definitions, any value equal or above 0x02 is a reference to an image group index. But to use it you’ll need to subtract 2 to get the correct index value. A value 0x00 marks the end of a frame and 0xFF marks the end of the animation.

Each frame is drawn on top of the old one. Meaning that if you want to create the fifth frame in an animation you’ll need to draw the first four frames first to make sure it looks correct.
Transparent rectangles
When working with the animations you will stumble upon the images that are nothing but transparent pixels. These are used to tell the game where it needs to redraw the background when drawing a new frame on top of the old one.
How to construct an animation from the instructions.
To display an animation in the instructions, you start by reading the header to get the offset for where the animations are listed as an array of word offsets. Jump to that location and select the animation you want to use and jump again to its offset.
From that offset position, all the following bytes up to the first 0xFF define the animation. It is divided into several slides by the 0x00 byte value. All bytes with value 0x02 and up are references to image groups used to build the slide. You’ll need to subtract 2 from those numbers to get which offset to use in the list of image group offsets (using zero as the starting number).
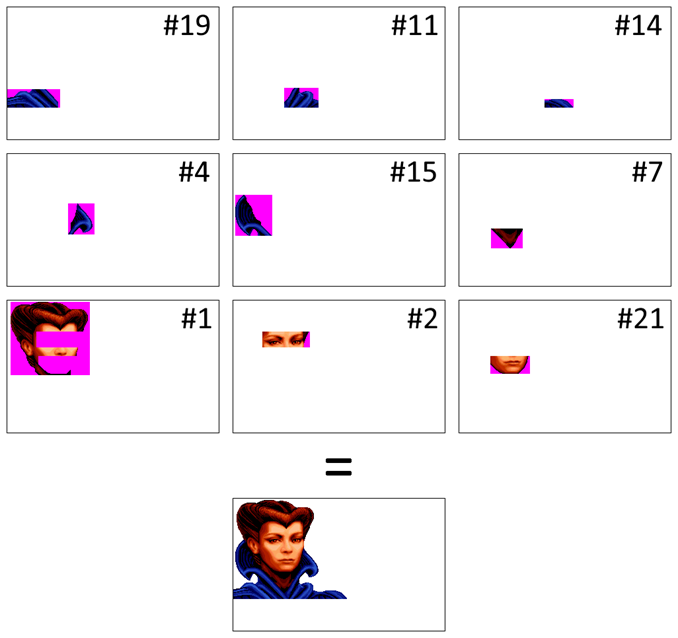
Using the data from the example images above we get:
| Slide | Image groups | Images |
|---|---|---|
| #1 | 0, 1, 2 | 19, 11, 14, 4, 15, 7, 1, 2, 21 |
| #2 | 0, 1, 2 | 19, 11, 14, 4, 15, 7, 1, 2, 21 |
| #3 | 0, 1, 3 | 19, 11, 14, 4, 15, 7, 1, 2, 25 |
| #4 | 0, 1, 1, 3 | 19, 11, 14, 4, 15, 7, 1, 2, 25 |
| #5 | 0, 1, 1, 4 | 19, 11, 14, 4, 15, 7, 1, 2, 22 |
| #6 | 0, 1, 1, 4 | 19, 11, 14, 4, 15, 7, 1, 2, 22 |
| #7 | 0, 1, 5, 6 | 19, 11, 14, 4, 15, 7, 1, 2, 5, 26 |
| #8 | 0, 1, 5, 3 | 19, 11, 14, 4, 15, 7, 1, 2, 5, 25 |
| #9 | 0, 1, 1, 3 | 19, 11, 14, 4, 15, 7, 1, 2, 25 |
| #10 | 0, 1, 1, 4 | 19, 11, 14, 4, 15, 7, 1, 2, 22 |
| #11 | 0, 1, 1, 4 | 19, 11, 14, 4, 15, 7, 1, 2, 22 |
| #12 | 0, 1, 4 | 19, 11, 14, 4, 15, 7, 1, 2, 22 |
| #13 | 0, 1, 2 | 19, 11, 14, 4, 15, 7, 1, 2, 21 |
| #14 | 0, 1, 2 | 19, 11, 14, 4, 15, 7, 1, 2, 21 |
(I don’t know why image group 1 is selected more than once. I have not had time to investigate if that is mistake in file or not)
Now each image group also contains additional X and Y position offsets. Position offsets that should be added to the X and Y offsets in the header so we get the correct position to place the image on screen. In the example file I have been using, jess.hsq, the offset defined in the header is zero for both X and Y. So no change is made to the offsets defined in the image group.
| Image | Final Image Group X,Y |
|---|---|
| 19 | 0, 124 |
| 11 | 77, 122 |
| 14 | 129, 139 |
| 4 | 92, 75 |
| 15 | 3, 62 |
| 7 | 48, 113 |
| 1 | 5, 2 |
| 2 | 44, 47 |
| 21 | 47, 84 |
Now we have everything we need to construct a frame. We simply need to draw each image on the screen to construct the frame. The image might contain transparent pixels that should not be drawn (has palette index #0). Below I have chosen to draw them as magenta to show the whole image.
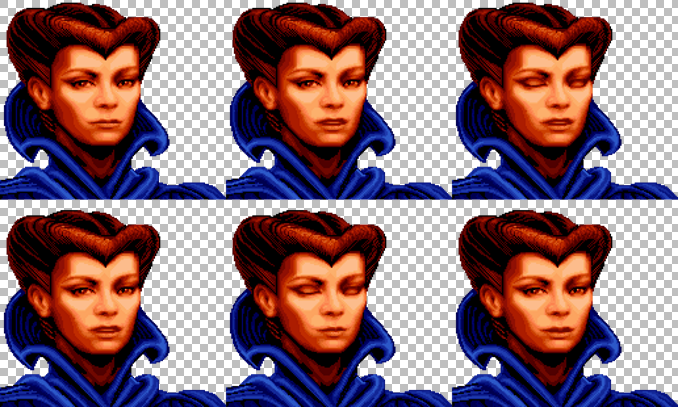
And to finish the animation, just do the same for all frames.
Animation speed
I have looked at the code to determine how often a new frame is drawn to screen, and it looks like it is set to about once per 160 ms. Below is an animation with that speed.

Next?
This is all the information I have about the image files and what they contain. There are still parts that I haven’t figured out, but for now I’m done with them.
Next post will be about how I managed to obtain all this information.
/Henrik