Exploring the Dune files Part #1 - The HSQ File format
The logical start of exploring the Dune resource files is to understand how they are compressed. In the era of floppy disks every byte was important, so it is not surprising that we’ll need to run the files through a decompressing algorithm before we can analyze them further.
I have found several pieces of code for decompressing the files written by various people, but no good explanation of exactly how the compression work. This blog post will be my attempt at filling that void. I will below describe how a compressed file looks and how to read it to produce the original uncompressed file.
To figure out how the compression works, I mainly studied the code found on this page but also checked this page to verify that I understood things correctly (I also found this page with additional code examples, but didn’t studied it). Having never worked with algorithms for compression/decompression before, everything in this post was new territory for me.
The HSQ algorithm looks for repeating patterns and replaces later instances with reference to an earlier instance. One of the above mentioned pages mentions that the algorithm is similar to a [LZ Dictionary coder](http:// https://en.wikipedia.org/wiki/LZ77_and_LZ78). In this case the reference that is created consists of the size of the repeating pattern and how far back the it is. I will refer to these values as the Length and the Distance respectively.
(One nice side note I need to mention is that the game can read both compressed and uncompressed files. So once you have uncompressed a file, it can still be used by the game. This makes it a lot easier if you want to modify anything in the game.)
Edit: Since publishing this post, I found out some more information about the HSQ compression. Read about it here
Prerequisites
I will assume you know about the following things:
All values will be little endian unless otherwise specified.
Header
A HSQ-file starts with a 6 bytes header. The first 3 bytes is the size of the uncompressed file, the following 2 bytes the size of the compressed file and the last byte is used as a checksum value.
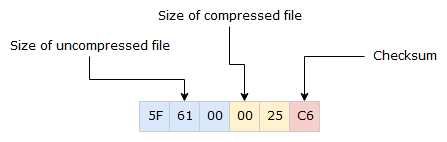
In the above example the size of the uncompressed file is 0x615F or 24927 bytes and compressed file is 0x2500 or 9472 bytes. The checksum value is used to check that the header is correct. Adding all the 6 values should result in a hexadecimal value ending with 0xAB (or simply be 0xAB if a single byte value was used for adding).
Instructions
After the header, the next two bytes are the first of many instructions on how to construct the output. The instructions are read by going through the bit values from least to most significant.
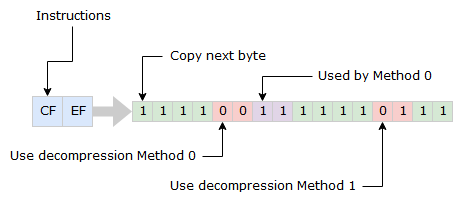
If the bit is 1, copy the next byte in the input to the output and move both read and write position forward by one in the respective streams.
If the bit is 0, use one of two decompression methods to continue filling the output with bytes. Which method to use is determine by the following bit. I have named the methods Method 0 and Method 1 after the bit values. If Method 0 is to be used the following two bits will be used by it (Explained more below).
When all instructions are used, two new bytes are read from the input. Important to note is that sometimes the bits used for decompression can be placed in two following sets of instructions.
Method 0
The decompressing algorithm Method 0 is triggered by two 0 bits after each other. The two following bits in the instructions are used to determine the Length and the next byte is used to determine Distance.
Length is calculated by reading the two bits in Big endian fashion and then adding two. Like this:
[First Bit] * 2 + [Second Bit] + 2 = Length
Length is will always be between 2-5 bytes. In the example above length is set to 5.
The byte that determines distance should be read as a signed byte and will always be negative. Meaning distance can be from -1 to -128. In the example above Distance is set to -9.
To get the position from where to find the bytes to repeat, take the current position in the output stream and add the negative distance to it. (It is possible for distance to be shorter than length. I will explain that scenario further down in this post).
The above example the input stream will result in the output stream below.

Method 1
Method 1 is a bit more complicated than Method 0. The base logic is the same, but Method 1 differs in how length and distance is calculated. And it can also used to mark the end of the compressed stream.
Just as Method 0, the usage of Method 1 starts with a 0 in the instruction bits, but followed by a 1 instead of 0. Once triggered the two following bytes in the input stream are read to get Length and Distance. The three first bits have a dual usage, if they are all zero the next byte should be used for length. If not they will be used for calculating Length and the of the bits are for calculating Distance.
Example 1
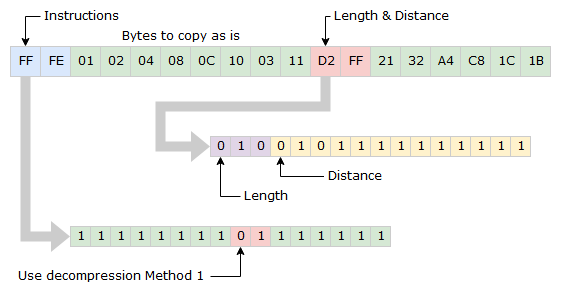
If the first three bits are not all zero, the Length is calculated by reading the three bits as a binary number and then adding two.
[First Bit] + [Second Bit] * 2 + [Third Bit] * 4 + 2 = Length
The length will be between 3 and 9.
The reaming 13 bits are read as a signed byte to get the Distance. Just as in Method 0, the value will always be negative, between -1 and -8192.
In the above example, the input stream will result in the following output stream.

Example 2 (with alternative Length byte)
Here is an example of when the three first bits are all zero and the next byte is used for Length instead. The byte is read as an unsigned integer and then 2 is added to it.
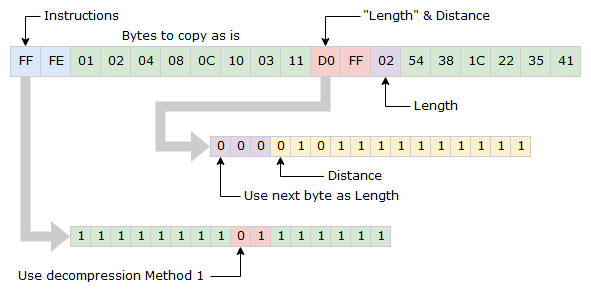
As in earlier explained logic, 2 is added the the Length value. In the example above Length is 4.

Example 3 (with End of Stream marker)
To make the Method 1 even more complicated, the alternative Length byte also has a dual usage. If it is set to zero, it means the end of the input stream has been reached.
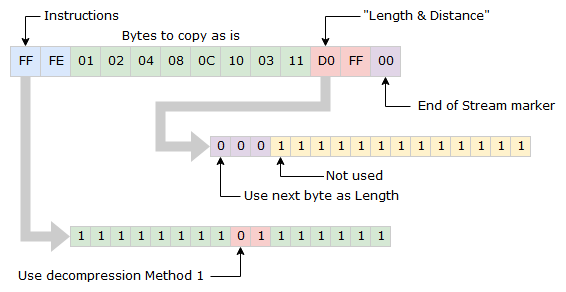
The output is simply:

Length longer than distance
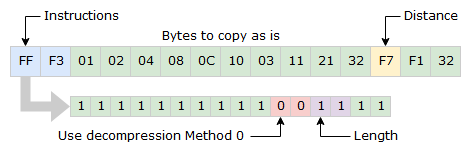
One important thing to note when decompressing HSQ files, is that the Length value can be a larger number than the Distance. Below is an example of this, where Length is 6 and the Distance is -2.

Here an decompression algorithm can’t read all the bytes from the output before adding them to it again. To make it work, it will need to copy the bytes one by one so the output stream gets longer while the bytes are copied. It should add “03” and “11” again and again until the Length of 6 is achieved. Below is the output.

My program
To confirm that I understood how the HSQ compression worked I wrote my own little program. And to really confirm that I understood it, I intentionally wrote it in a different way than the code parts I studied. I also tried to write it in a way that it would make it easy to understand how the compression was done from studying the code.
I have uploaded the code as a text-file to make it easy to study in a web browser. Unit tests are in a separate file.
Source code: https://zwompmedia.z6.web.core.windows.net/2019/dune/dune_hsq_handler.cs_.txt
Unit Tests: https://zwompmedia.z6.web.core.windows.net/2019/dune/dune_hsq_handler_tests.cs_.txt