Exploring the Dune files – The Image files
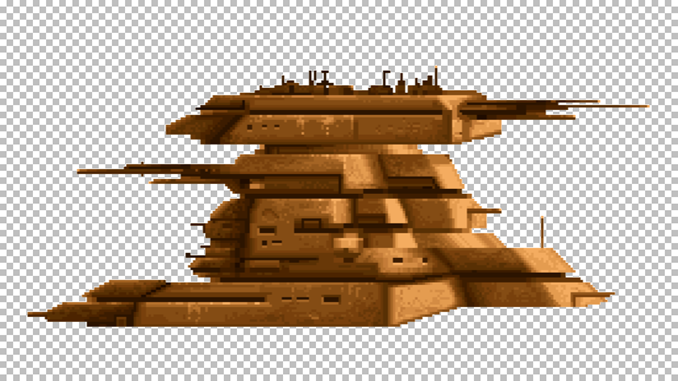
After I figured out the HSQ compression, I started to look into the image files. Something I thought would be relative easy as there was, as with the HSQ compression, code to study. But the code bits I found were incomplete and in some cases wrong. To fill in the gaps I had to do some investigation of the image data myself and in the end, partly reverse engineer the Dune executable.
I still haven’t figure out all the parts of in the files I have studied so far. But I feel like it is time to write a new post about the subject and I would like to shift my focus to other parts of the game.
In this blog post I will go through which files I have been studying and their general layout. In later posts I will go into the various parts in detail and lastly I will write a post about how I managed to gathered all this information.
But firstly, I would like to give credit to the initial sources I used when I got started: bigs.fr and Dune Revival.
The files
In this and the following post, the files I call image files are listed below. I have included information on which various parts they contain too. All parts will be described below.
The file parts
As you can see in the list above, no non-image part exist in all image files. They only have the image parts in common. The non-image parts are briefly explained as:
- Default palette: The color definitions used by the images in the file. If this part is missing the game will use the colors already loaded into memory.
- Transparent rectangle: Basically an image part that when processed will result in an transparent image. I have found that some of them are used in animations. Together with animation instructions they will mark out an area to copy from one Image buffer to another. It is possible that some transparent rectangles have other purposes.
- Alternative palette: Additional palette for the game to use. For example they are used to give the various stages of the day different environment colors and for animation effects.
- Animation instructions: Data for how to construct animations from the images in the file.
- Unknown parts: I still have three files that I have not fully deconstructed yet. Looking at the bytes they look like three distinct parts, but I have yet to verify that.
The general file layout
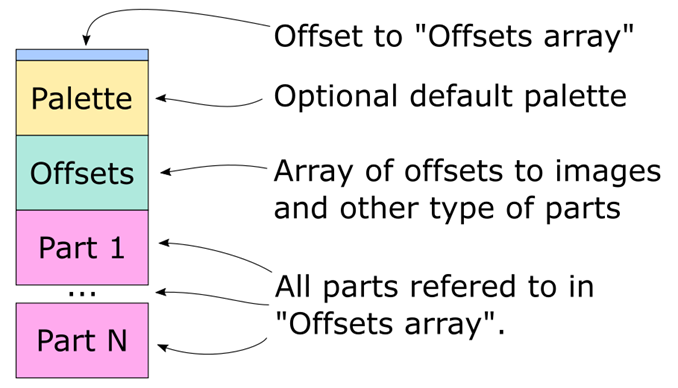
All files will start with two bytes that is the offset to where an array of part offsets is located in the file (That and all numbers in the files should be read as little endian.)
Between that initial word and section of part offsets is where the default palette will be if defined. All files without a default palette will start with a word with the value of 2.
The Part Offsets section is an array of word sized offsets. Each offset defines the distance from the start location of the array to the start of the part. This means to get the location of one part, the offset found at the start of the file should be added to the offset found in the array.
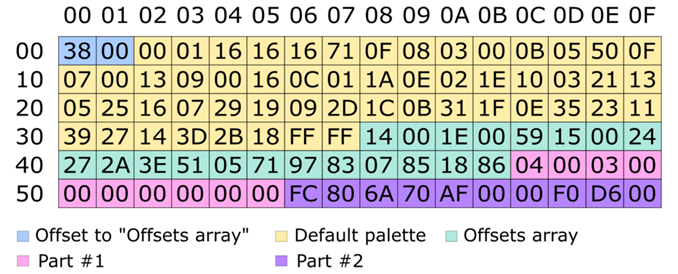
For example, to find the start of the first part in the file fort.hsq:
- Read the first word, 0x0038
- Use that value to find start of array and read the first word of it, 0x0014.
- Add both values to get the offset of the first part, 0x0038 + 0x0014 = 0x004C.
To find the second part, add the second word of the array instead: 0x0038 + 0x001E = 0x0056.
The length of the array is not defined. Calculate the offset of the first part to find where the array ends.
The array will always start on an even number. This is to make the array “word aligned” in memory. The old x86 systems could read two bytes at the same time, but only if the first byte was on an even address. So making sure word values would be properly aligned in memory was a way to give the game a performance boost.
Next
That’s it for this post. Next time I’ll go through how the palettes are structured. /Henrik